

Mining should be very simple from building your mining operation and also monitoring. Building mining rigs since 2016 and have used many different kind of hardware for mining. Sometimes mining could be very skill based. Mining as a industry growing every year, and new hardware has been released. Lately i have been focusing on building mining rigs in all in one , ready to go setups. Setups where you just need to install GPUs and software to start mining. If you are following my tutorials couple month ago i have installation tutorial for setting up MineBox8. Which is all in one 8xgpu mining case.
So today i have NEW 12xgpu mining rig case/chassis. Components included in this setup:
| Q-412 | GPU mining machine system without graphic card |
| PCI-e cables | 24x 6+2+6+2 pin cables for graphic cards |
| Motherboard | ONDA B250 D12P-D3, 2*2.0 USB,1*Power LED,1*HDD LED,1*POWER SW |
| CPU | Intel Celeron G3900 |
| internal | DDR3 8G |
| SSD | 64G SSD |
| Case | 1.2mm SGCC Zinc-Coated Steel |
| PSU | 220- 240VAC/50~60Hz/12A |
| Fan | 5*12038 fans |
| Total Power | 2400W±10% |
| Application temperature | —10~45℃ |
| Miner Dimension | 737.6mm(W)*410mm(D)*185mm(H) |
| Packing Dimension | 860mm(W)*53.5mm(D)*300mm(H) |
| Packaging Details | Carton+PE foam |
| Net weight | 17±5% Kg |
| Gross weight | 20±5% Kg |
The installation is quite easy and you can start mining in matter of minutes. Just follow the steps down bellow.
Mining Case assembling:
- Mining case MineBox 12 is ready to go mining case. Just remove all the packaging and you can start to install graphic cards straight away.
- Install GPUs in 12 – 16xPCI-e motherboard slots, screws also are included to attach them to case that they are built in rock solid.
- Attach power cables to Graphic cards, there is enough power cables to power up even the most power hungry graphic cards. Be very careful with cards which use a lot of power and has more then one 8pin pci-e connection. You might burn the cable, there is slitter cables used on this case.
- When GPUs are installed, there is also included bar. Which you can screw in to hold your graphic cards even tighter.
To start mining:
- For mining im using hiveOS, which is one of the easiest mining software’s to use. For installing hiveos i have flasher, which is great to installation tool. If you dont know hot to make flasher utility comment down below, i can do a setup tutorial if needed.
- Connect your lan cable, atx psu cable, flasher utility, keyboard and hdmi cable to motherboard for your monitor. Then boot up mining rig.
- While mining rig is booting , keep pressing DEL on keyboard. This will take you in motherboard bios.
- You need to get in BIOS to select primary boot option from your hiveos flasher, which will flash hiveOS to your hard-drive. Otherwise it will boot in Chinese windows which is currently installed.
- After saving primary boot option as your flasher, reboot mining rig. After rebooting it will start automatically installing hiveOS on your system. You will know when its done, it will shutdown the mining rig.
- Now remove the flasher utility from miner and boot the mining rig.
- You are done , it will connect to your hiveos account (apply flight sheet and OC) happy mining.
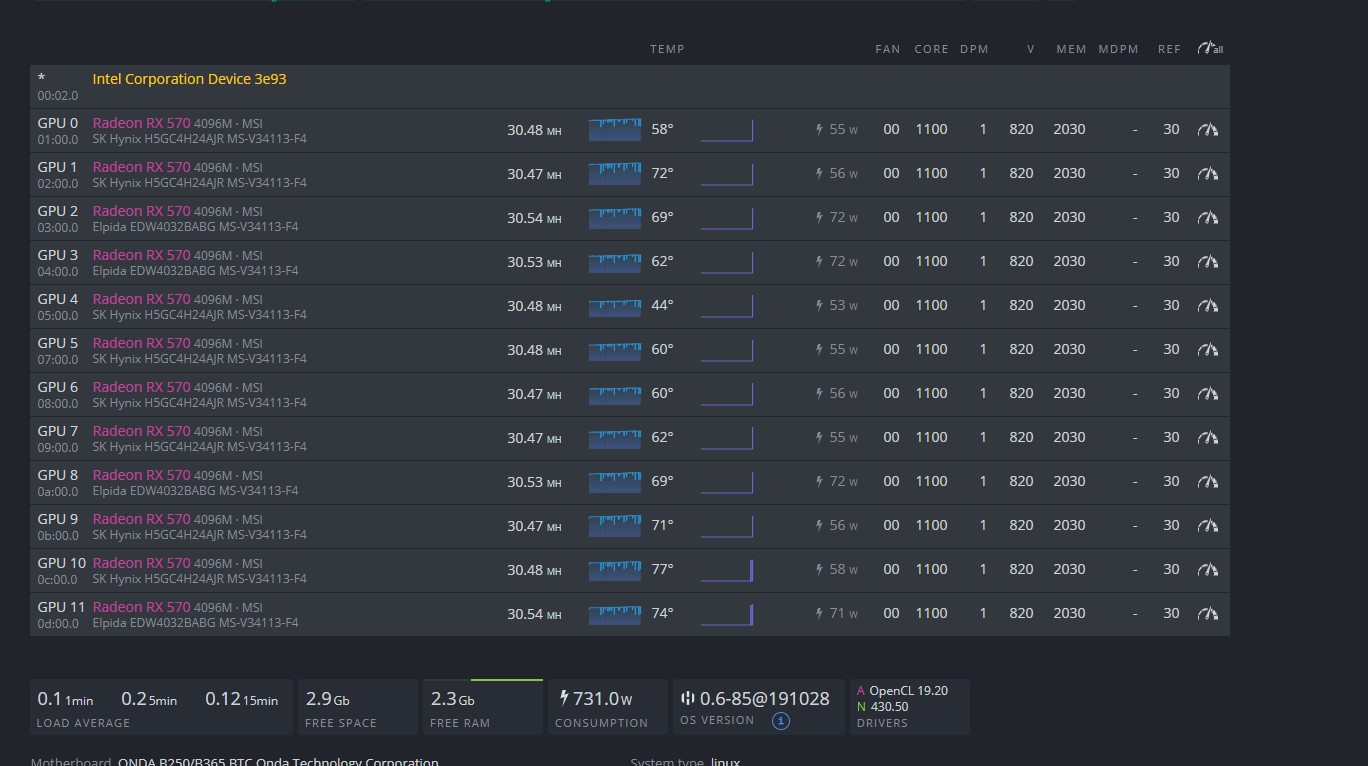
So in my test bench i have installed 12x MSI RX570 4gb cards:
- Total hashing speed is 366 mh/s
- power usage 1500w
- Temperatures on GPUs 40-60c (fans on GPU are switched off)

Video :
jimy
Hi
Is it possible to mining in windows? Cheers
Milan
Hi there
I cant see any problems about that 🙂
Milan
Hi there great setup how much much volt does the mb take with the 8 pin connecter begause my psu is sending like 17.5 V into it an it will not start up. NADA power on the mb 🙁
it is a QW2500W PSU
just.faza94
How do I install the system Can you make a detailed section? I’m very beginner